 Français
Happy New Year ’21!
Author Archives: SiZiOUS
Using VMware & Docker? Read this!
I’m using VMware Workstation (in my case, Workstation 15.5.1) on my Windows 10 computer and I wanted to install Docker. After installing Docker and enabling some Windows features, e.g. Hyper-V, I was able to use it properly.
But now, when I try to run a VM in Workstation, the following message is displayed:
|
1 2 3 |
VMware Workstation and Device/Credential Guard are not compatible. VMware Workstation can be run after disabling Device/Credential Guard. Please visit http://www.vmware.com/go/turnoff_CG_DG for more details. |
This strange message is linked to Hyper-V. VMware products can’t be used if Hyper-V is installed. At the same time, Docker needs Hyper-V to run!
The only option you have to allow a VM to start is to disable Hyper-V. So I tried to disable the feature in Windows but this isn’t sufficient! You need to change a parameter in the boot registry too.
The issue is, if you disable Hyper-V, Docker will not run! So you have a choice to make here. Everytime you want to use Docker, you have to enable Hyper-V; and if you want to use VMware products, you have to disable Hyper-V… Find below the commands to execute in both cases.
Disabling Hyper-V: Use VMware products
Open a PowerShell in Administrator mode then type:
|
1 2 |
bcdedit /set hypervisorlaunchtype off Disable-WindowsOptionalFeature -Online -FeatureName Microsoft-Hyper-V-All |
Then restart. Now VMware products (Player or Workstation) may run!
Enabling Hyper-V: Use Docker
Now if you want to use Docker, you have to enable again Hyper-V. Open a PowerShell in Administrator mode then type:
|
1 2 |
bcdedit /set hypervisorlaunchtype auto Enable-WindowsOptionalFeature -Online -FeatureName Microsoft-Hyper-V-All |
Then restart. Docker may now be used but not VMware products.
Final note
This situation will not stay like this, but for now it’s the only workaround you have. The issue is under investigation.
Happy New Year ’20!
I just want to wish you a happy new year 2020! 🙂
A new decade was now started and the Dreamcast scene is almost alive, and that’s a pleasure to see that!
I’ve not posted so much things here but don’t worry, speaking about my hobbies, I’m working on the coming DreamSDK R3 package, but I’m really slow because as you might know, so much work for little free time…
In the meantime, see you around!
How to set Google Chrome by default on Lubuntu 19.04
Recently I wanted to set Google Chrome by default on my fresh Lubuntu 19.04 VM and despite the presence of the Make Google Chrome as default browser button, it never works: Firefox remains the default browser.
I wanted to setup Google Chrome by default without uninstalling Mozilla Firefox as I use both browsers. Open a Terminal then do the following:
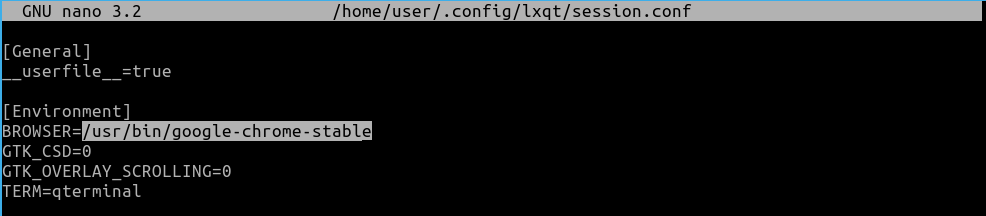
nano ~/.config/lxqt/session.conf
Change the BROWSER variable to /usr/bin/google-chrome-stable as shown below. Save the changes.
Type: sudo update-alternatives --config x-www-browser then choose the /usr/bin/google-chrome-stable entry in manual mode (2 in the screenshot below).

Type: sudo update-alternatives --config gnome-www-browser. Do the same as above.
Type the following commands:
|
1 2 3 4 |
sudo xdg-settings set default-web-browser google-chrome.desktop sudo xdg-mime default google-chrome.desktop x-scheme-handler/http sudo xdg-mime default google-chrome.desktop x-scheme-handler/https sudo xdg-mime default google-chrome.desktop text/html |
Then restart the computer (sudo reboot). Check now if the $BROWSER variable is OK by typing echo $BROWSER:

Then now, when checking Firefox, it should says that the browser isn’t the default, and Google Chrome shouldn’t complain!
DreamSDK R2 was released in March ’19
I totally forgot to post here, but I’ve recently released the DreamSDK R2 package!
A lot of improvements and changes are included in this release, like:
- Full Code::Blocks IDE integration, including debugging on the real hardware, directly from the IDE!
- DreamSDK Manager was redesigned and improved a lot.
- A lot of new tools are included now, like makedisc, allowing you to create CD releases of your programs.
- The Help content was improved a lot and it’s now available online (and of course, it’s still available in the package too).
- A lot of other things that you will find out by yourself!
For those who don’t know what is DreamSDK, it’s a package which contains everything you need to develop for the Sega Dreamcast video game console on Microsoft Windows. This isn’t a ready-to-use high level framework like Unity, it’s a low-level SDK which is based on KallistiOS (KOS). So you’ll need to learn Dreamcast programming with KOS and learn C/C++ programming languages.
Happy New Year ’19!
I just want to wish you a happy new year 2019! 🙂
May the Dreamcast be with you this year!
DreamSDK R1 is released
So after almost 2 months of intensive work, I’m really happy to announce you that my latest project is done: DreamSDK R1 is out.
DreamSDK is a modern, ready-to-use environment for the Sega Dreamcast development designed for the Microsoft Windows platform.
Main features are:
- Fast & easy to install: just double-click on the setup file and let the program install & configure everything for you.
- Ready to use: All the required toolchains (for the SuperH & Yamaha AICA) are already prebuilt and ready-to-use.
- Lightweight: Thanks to the MinGW/MSYS environment, the space used on the disk is minimal.
- Configurable & upgradable: With the included DreamSDK Manager tool, manage DreamSDK components really easily.
- Respectful of the standards: DreamSDK is 100% compliant with the KallistiOS standards and documentation.
This package has a very different approach comparing to the others packages of this kind. The major difference is that KallistiOS is not included: instead it’s downloaded/installed from DreamSDK Manager, which is a tool part of this package. This will keep up-to-date your installation and will allow DreamSDK always be usable, as only the toolchains (SuperH & Yamaha AICA) are included (which don’t changes often). In clear, doing so will give you the possibility to update KallistiOS directly from the DreamSDK environment.
Please also note that I’m using the official KallistiOS repositories (kos and kos-ports) and not my repositories (which contains various fixes on the build systems). The exception is dcload-serial and dcload-ip: I’m using my repositories as official ones will not compile on MinGW/MSYS without my fixes.
DreamSDK was built to be the greatest environment for Sega Dreamcast development on Microsoft Windows. I hope you’ll enjoy it as much I enjoyed to make this package.
Note: This package contains only free & open source tools and libraries.
My GitHub account was updated!
As I stated on Twitter, I’ve released all the source codes of all my tools I’ve published through years. Most of them are written in Pascal Object/Delphi, but some of them are written in C/C++.
All these tools were originally published almost 15 years ago, so a lot of them will not work on modern OS like Windows 10.
Maybe I’ll try to adapt/convert them for newer OS, maybe I won’t, who’s knows? 🙂
Lars Olsson mirror is available!
I’ve just a made a mirror of the excellent Dreamcast site run by Lars Olsson.
You can find it here.
Apache Maven: How to extract XML node values from the pom.xml (in pure batch!)
If you are a Java developer you certainly know Apache Maven, which is (more or less) a Make equivalent for the Java world.
Some days ago I needed to automatically extract some values from the pom.xml file to automatize some operations. For example, I wanted to extract the values of the groupId, artifactId and version nodes from a Maven project, i.e. from the pom.xml file.
I finally created a pure Windows batch solution in order to do that, I called this little utility: POM Tool.
Here is the source code of it:
|
1 2 3 4 5 6 7 8 9 10 11 12 13 14 15 16 17 18 19 20 21 22 23 24 25 26 27 28 29 30 31 32 33 34 35 36 37 38 39 40 41 42 43 44 45 46 47 48 49 50 51 52 53 54 55 56 57 58 59 60 61 62 63 64 65 66 67 68 69 70 71 72 73 74 75 76 77 78 79 80 81 82 83 84 85 86 87 88 89 90 91 92 93 94 95 96 97 98 99 100 101 102 103 104 105 106 107 108 109 110 111 112 |
@echo off setlocal EnableDelayedExpansion set POM_TOOL_VERSION=20180914 rem Parameters set MAVEN_POM_INPUT_TAG=%1 set MAVEN_POM_FILE=pom.xml if "%2" neq "" set MAVEN_POM_FILE=%2 rem Check input parameters if "%MAVEN_POM_INPUT_TAG%"=="" goto help if "%MAVEN_POM_FILE%"=="" goto error_pom_not_found if not exist %MAVEN_POM_FILE% goto error_pom_not_found rem Compute start/end positions to extract the value from the XML tag call:strlen %MAVEN_POM_INPUT_TAG% set /a TAG_BEGIN=%_strlen% + 2 set /a TAG_END=(%TAG_BEGIN% + 1) * -1 rem Perform the XML tag value extraction call:extractxml %MAVEN_POM_INPUT_TAG% %TAG_BEGIN% %TAG_END% if "%_extractxml%"=="" goto error_extraction_failed echo %_extractxml% goto:eof :::::::::::::::::::::::::::::::::::::::::::::::::::::::::::::::::::::::::::::::: rem --- rem Display help message rem --- :help call:banner echo Usage: %~n0 ^<xml_tag^> [pom_file] echo. echo Example: %~n0 version - will return artifact version echo %~n0 groupId - will return artifact groupId goto:eof rem --- rem Error: The requested tag was not found rem --- :error_extraction_failed call:banner echo Error: The tag "%MAVEN_POM_INPUT_TAG%" wasn't found in the "%MAVEN_POM_FILE%" file. goto:eof rem --- rem Error: The Maven POM file wasn't found rem --- :error_pom_not_found call:banner echo Error: The "%MAVEN_POM_FILE%" file wasn't found. goto:eof rem --- rem Function: banner rem Used to display the tool banner rem --- :banner echo POM Tool - Ver. %POM_TOOL_VERSION% echo. goto:eof rem --- rem Function: extractxml rem Used to parse %MAVEN_POM_FILE% for extracting tags value. rem Usage: call:extractxml %param% where %param% is the tag to search. rem --- :extractxml setlocal set _extracted_xml_result= set _token=^<%~1^> set _begin=%~2 set _end=%~3 for /f "tokens=*" %%a in (%MAVEN_POM_FILE%) do ( set row=%%a if /i "!row:%_token%=!"=="!row!" (echo NOP > nul) else ( set _extracted_xml_result=!row! if /i "!_extracted_xml_result!" neq "" goto extractxml_endloop ) ) :extractxml_endloop set "_final=%_extracted_xml_result%" if "%_final%" neq "" call set _final=%%_final:~%_begin%,%_end%%% (endlocal if "%~1" neq "" set "_extractxml=%_final%" ) goto:eof rem --- rem Function: strlen rem Get the length of a string rem Thanks to: SS64 (https://ss64.com/nt/syntax-strlen.html) rem --- :strlen setlocal set _str=%~1 rem Remove any quotes set _str=%_str:"=% rem Test if empty if not defined _str echo endlocal & set _strlen=0&goto:eof set MAX_STRING_LENGTH=256 for /l %%g in (0,1,!MAX_STRING_LENGTH!) do ( REM extract one character set "_char=!_str:~%%g,1!" REM if _char is empty we are at the end of the string if not defined _char endlocal & set _strlen=%%g& goto:eof ) goto:eof |
Just copy-paste that source code into a new file and call the file pomtool.cmd.
The usage is pretty simple:
|
1 |
pomtool artifactId c:\temp\my-maven-project\pom.xml |
This will give you the value of the artifactId node for the c:\temp\my-maven-project\pom.xml file!
Of course you can include a call to the POM Tool in another batch file, for example:
|
1 2 3 4 |
@echo off for /f "tokens=*" %%i in ('pomtool description c:\my\project\pom.xml') do set "PROJECT_NAME=%%i" echo %PROJECT_NAME% pause |
In that way, the %PROJECT_NAME% variable in your batch will have the output of the POM Tool utility, in that example the content of the description node! 🙂
Don’t hesitate to comments if you have any question! 🙂