Author Archives: SiZiOUS

Installing DiscJuggler on Windows 10

If the Sega Dreamcast world is familiar to you, you most certainly know the  CDI image format. CDI images are mostly bootable images for the Dreamcast: simply burn the CDI disc image and then put that burned CD-R inside the Dreamcast to see the game booting.

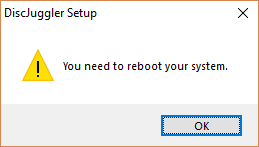
CDI images are generated with a tool named Padus DiscJuggler. The latest version (development is halted) is the 6.00.1400 version released back in 2007. Today, I wanted to install this tool on my Microsoft Windows 10 Pro x64 Update 1803 computer, but unfortunately it doesn’t work, this message always appears:

You need to reboot your system.

That’s obviously what I did. I restarted 3 times but nothing to do: this message is still displayed and the software does not install.

After disassembling the executable, the problem is simple. It’s caused by the presence of some values ​​in the Windows Registry under the RunOnce key. Since DiscJuggler is a 32-bit program, you have to check if there are values in these locations:

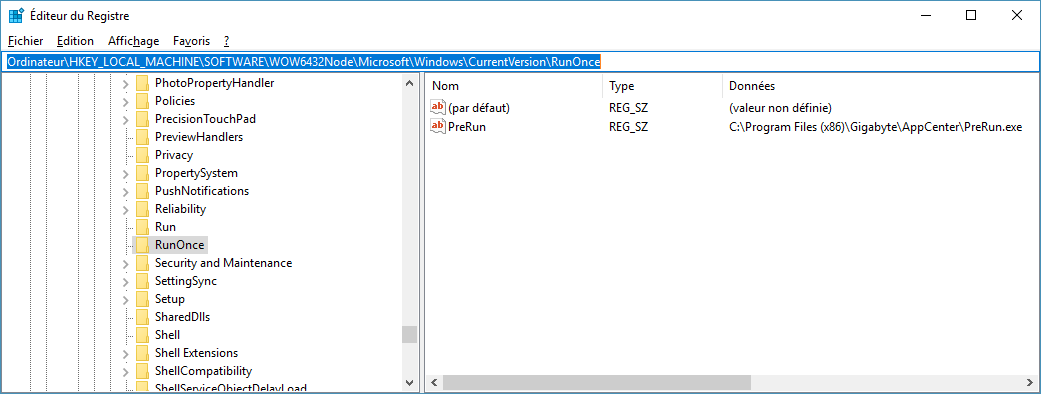
So actually in my case I had many values ​​in the keys above:

A value is present in the RunOnce key

In theory, it’s enough to restart the computer so that the RunOnce keys are cleared automatically of their values. Programs in these keys are in theory executed only once then these corresponding values ​​are automatically deleted (in this screenshot, the only value that exists is called PreRun).

But in my case, nothing works, the RunOnce key always contains something: this famous PreRun program from Gigabyte! This is because I actually have a Gigabyte motherboard and I’ve installed some tools that came with my motherboard. Even by deleting this value by hand (do not forget to run regedit in Administrator mode), it’s always re-created automatically (just hit F5 to see it reappearing after a few seconds …). So the installation of DiscJuggler always displays that You need to reboot your system. message…

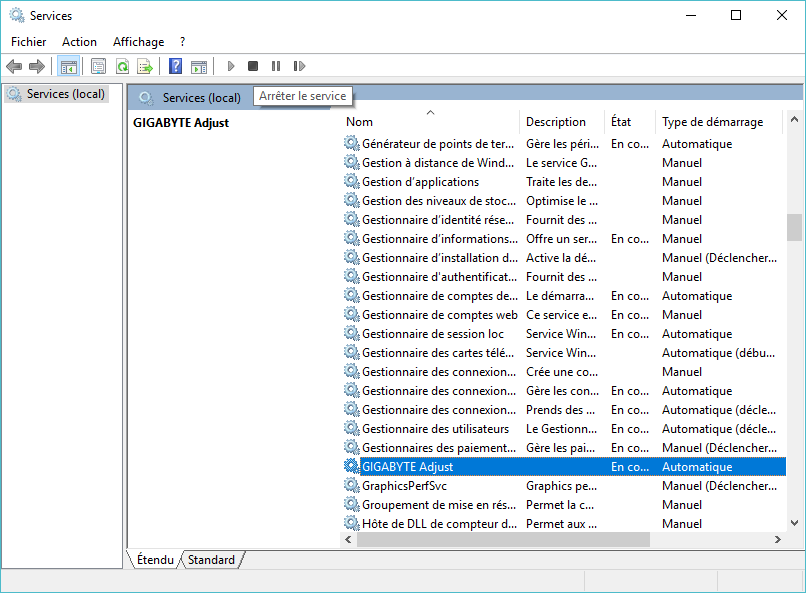
In my case, the solution is simple. I’ve just stopped the GIGABYTE Adjust service so the PreRun value isn’t recreated, just enough time to install DiscJuggler.

Stopping the GIGABYTE Adjust service

After doing this, the installation can begins:

Installing Padus DiscJuggler 6.00.1400 under Windows 10

And best of all, the program works very well under Windows 10! 🙂

Preparing the Raspberry Pi to act as a server

As you already know, the Raspberry Pi is a wonderful nano-computer with a lot of features. By default, the Raspbian OS is configured to be used as a desktop computer. But it’s better used like a server! To do that, we need to perform some cleanup (i.e. removing useless packages) and add some additional packages to convert our Pi into a real server!

Setting a static IP

Before starting, you should have set a local static IP. Click here to learn how.

If you have a dynamic IP address from your ISP, you should use No-IP or something similar in order to access the Pi from anywhere. Click here to learn how.

Removing useless packages

The commands below removes all desktop useless packages.

After that, we have a more lighter Raspbian OS.

Updating the Pi

Now it’s time to update your Pi, to be sure you use the latest packages.

Enter the following:

If you want, you can upgrade the distribution if you have installed your Pi long time ago:

Then, you can update the Pi firmware too:

Then to finish the update, your reboot the Pi:

Creating an update script

It’s a good idea to create a shell script to execute these commands regularly:

The copy the following in that script:

Then hit CTRL + X  and Y  to save.

Make it executable:

And now, you can execute it by :

Or you can use cron to execute it regularly automatically if you want, but I dislike this since I want to check the compatibility before doing anything!

Installing xRDP (Optional)

xRDP is a great package to access the Raspberry Pi throught RDP, which is the Microsoft‘s technology to use a computer remotely. Of course this is useful if your daily computer is Windows-based! In that case, you should run the mstsc executable. If you have an Unix system like Ubuntu or MacOS X, you can use Remmina (which is a RDP client) or just stick with SSH (which is enabled by default in Raspbian)!

To install it, follow this guide, or follow the steps summarized below.

The first thing to do is to disable the RealVNC client that comes installed with the latest Raspbian image because it causes some problems to xRDP.

Enter the following command:

Choose the  5 Interfacing Options option, then P3 VNC . Disable it when asked. After that, install the xRDP package:

Finalize by solving the ‘X’ cursor problem:

Now your Raspberry Pi can be accessed by xRDP.

Done!

So now you have a clean and ready Pi to be used as a server! 🙂

Happy New Year ’18!

I wish you a Happy New Year ’18 everyone! 🙂

Yeah I know my website is pretty dead but this is just a wrong feeling, I’m not dead, I just run out of time. 🙂

Cheers! 🙂

How to bypass Windows 10 session passwords

Last week I had to help someone who had lost their session password under Windows 10 Pro x64, version 1703 released in March 2017 (ID 10204029). We were in the worst of situations for several reasons:

  • The only available account was the one stuck with the lost password. And there was no Administrator account or equivalent activated.
  • No USB key for backing up the password had been generated.
  • This is a Windows 10 PC, so the traditional methods based on Ophcrack or Offline NT Password & Registry Editor don’t work, at least in my situation. For Kon-Boot however no idea if this one works because it is a shareware, so I didn’t have the possibility to test it.
  • It was an Ultrabook lacking optical disc drive (that’s for the even more annoying side of the thing…).
  • We didn’t have any restore media to reinstall Windows 10 if necessary, so it wasn’t possible to restore the computer to its original state because the recovery partition provided with the laptop works only in the case of an administrator password is provided.

In other words, the hope of getting out easily and without too much loss was quite low. I was a little desperate after trying for 2 good hours to find a solution. And it was by stuck on the login screen that I had an idea…

Principle

The idea is to hijack a functionality provided by the login screen to launch a Command Prompt so that you can change the password of the blocked account.

Please note that the solution I provide here only applies if you have not encrypted partitions with BitLocker. If this is the case, your data will be permanently lost when changing the password… If you don’t know what it is, you are not concerned. Also note, when changing the session password, all registered passwords (like Outlook or browser passwords) will be removed from the Saved passwords feature.

Prerequisites

Overall, the method requires 2 things:

  • A media containing the installation of Windows 10, in DVD format or USB key;
  • And a way to start on this media on the computer in question.

Necessary hardware

As mentioned in the introduction, it is simply a Windows 10 installation media. Please note that you don’t need a license key for our operation.

If, as in my case, the computer in question doesn’t have an optical disc drive (DVD-ROM), a USB key will do the trick. In this case, it is also necessary to recover an ISO of Windows 10, or even to create one from another machine, in order to create a bootable USB key with containing the installation program of Windows 10. There are plethora of tutorials on the Web, that’s why I don’t want to detail that procedure here to perform this operation.

Starting on an external device

It is imperative that you find the keyboard key that allows your computer to boot to the DVD-ROM or the USB key containing the installation of Windows 10. To do this, you must look in the settings of your BIOS. For the HP Envy, you must press the Esc key repeatedly: a menu appears with an option to choose the boot device.

I can’t describe this part in details because it depends heavily on the material used.

Method

Now that your Windows 10 installation media is ready and you know how to start on it, do it now. Once the preliminary installation menu appears, press the following keys: Shift + F10. A Command Prompt opens as shown below:

Ouverture de l'Invite de commandes depuis le média d'installation de Windows 10

The first thing to do is to determine the partition where your Windows is installed. You’re going to tell me it’s on the C: and you’re probably right. The trick is that Windows Setup can change (temporarily) the order of the partitions, and hence the access letter. To retrieve the correct partition letter where your Windows is accessible (i.e. “mounted”), enter the following command:

The Microsoft DiskPart program will start and list all available volumes. In my case, the installation of Windows is mounted on the D: drive. This is of course only true for this session, once the computer restarted, the partition will resume its original letter which is C:!

Now we can set up our trick. Enter the following commands (in case your Windows partition is D:, customize this as needed!):

If everything is OK, you can restart your computer by entering the following command:

Here is an example of all the commands entered:
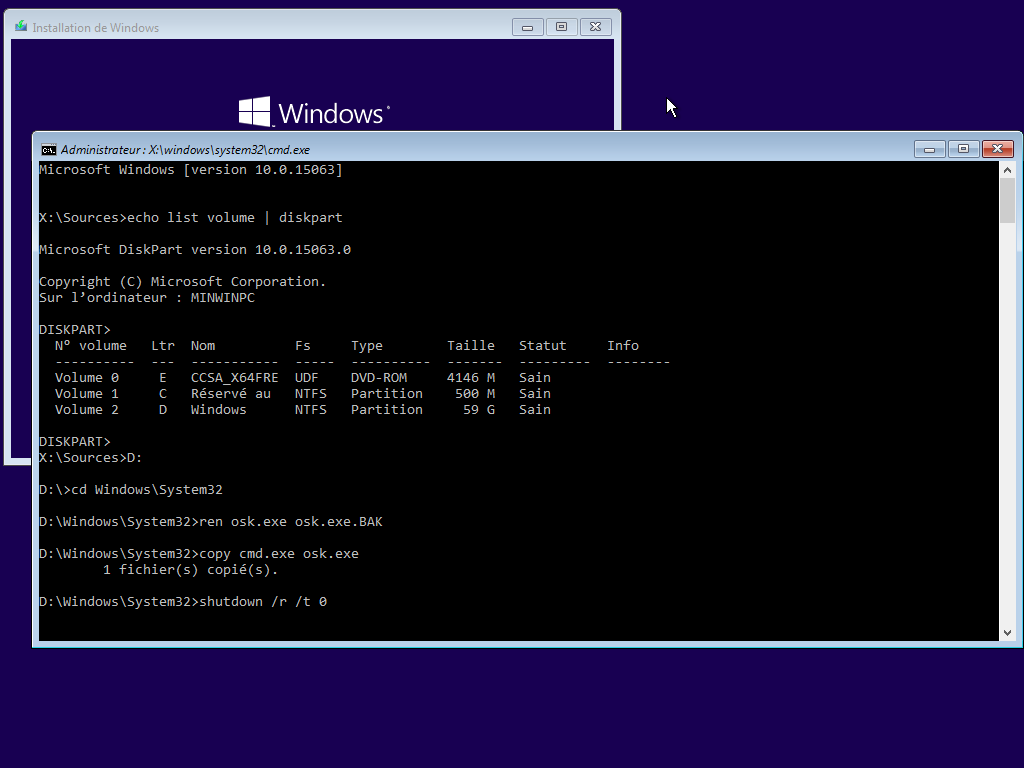
Détournement de l'utilitaire OSK

Now that your computer is booted, click the Ease of Access button and then click On-Screen Keyboard (OSK), as shown below.

Lancement du Clavier visuel

Instead of this one, an cmd Command Prompt will open! Then enter the following command to list the user accounts of the machine:

In my case, my blocked user account is called sizious. All you have to do now is change the password:

Here is an example of the commands entered at this point:
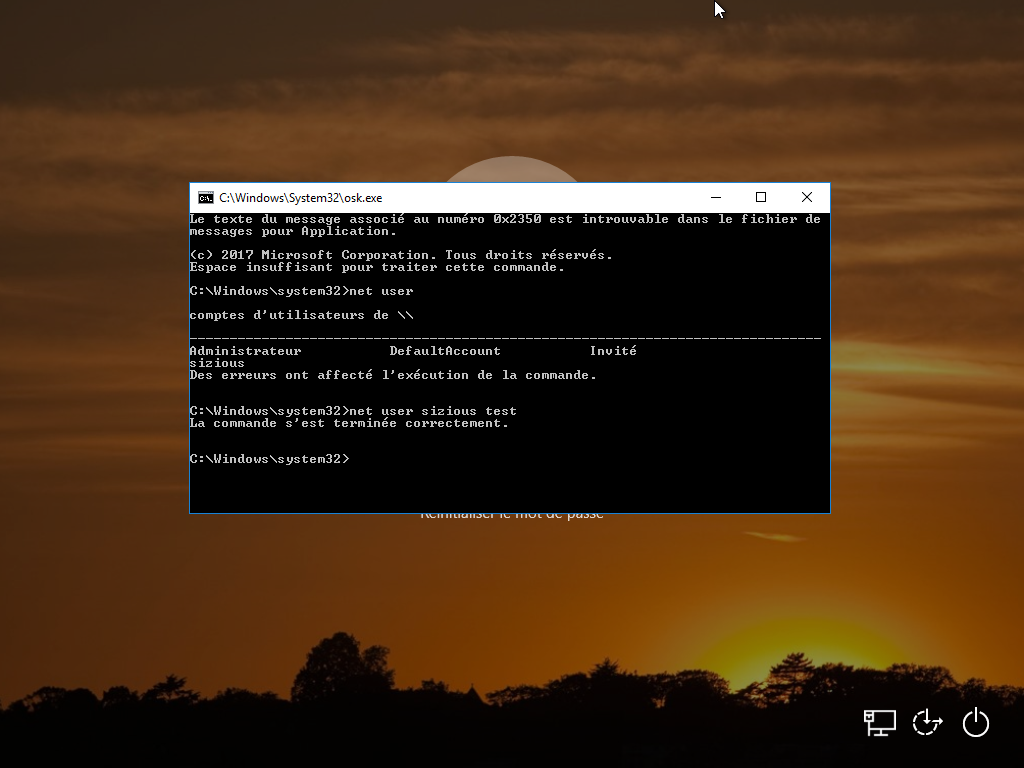
Déblocage du compte utilisateur

Now, just connect with the new password set (test in my case):

Connexion avec le nouveau mot de passe

One less fright! 🙂

Restoring the On-Screen Keyboard (OSK)

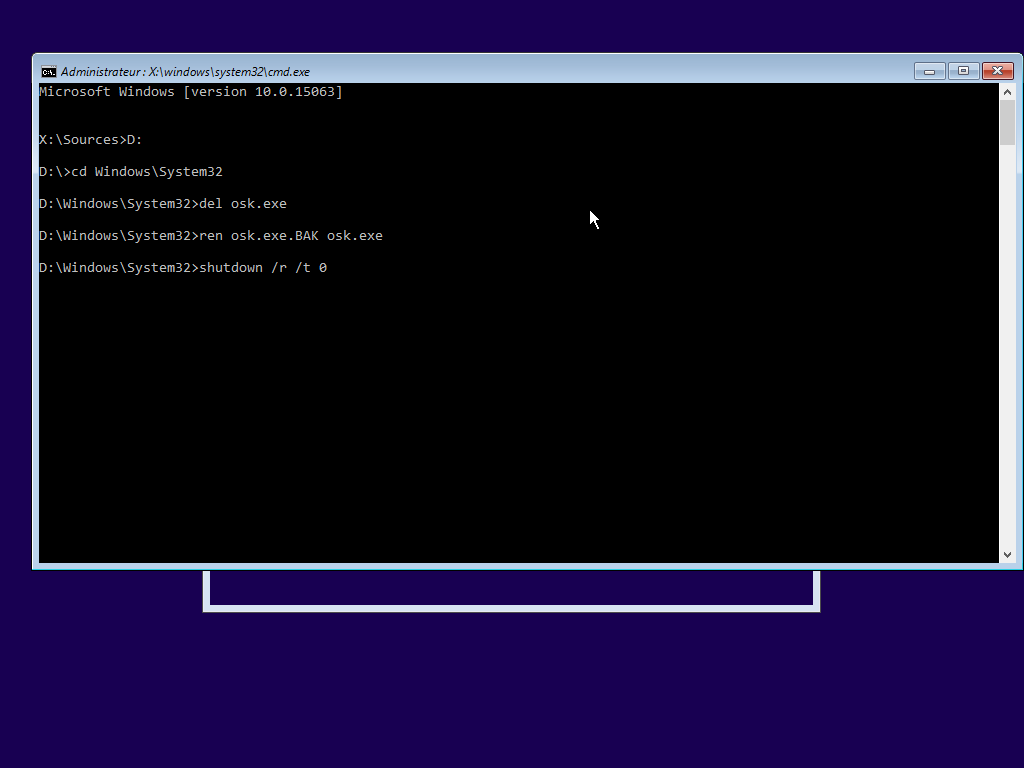
Now that we have changed our password, we need to restore the replaced On-Screen Keyboard (OSK). To do this, restart again on the Windows 10 installation media, and then press the keys Shift + F10 again.

Enter the following commands (adapt the letter D: on!):

Which therefore gives:

Remise en place de l'utilitaire Clavier visuel (OSK)

After the computer is restarted, select On-Screen Keyboard (OSK) in the Ease of Access options:

Vérification du Clavier visuel (OSK)

And now, everything is back in order!

Conclusion

You have now changed the password of an inaccessible account! 🙂

Now the necessary warnings: You must do this only on the machines you own and/or with the consent of its owner. I am of course not responsible for the damage and/or mishandling operations, I provide this information for informational purposes only, in the hope that they are useful to you.

Anyway, it saved me more than a day’s work!
How to solve the HP printer LAN connection issue

I own a HP Photosmart C5180 printer and sometimes, the LAN connection between the printer and my computer running Windows 7 is broken… even if the printer is switched on and “pingable” on the LAN.

Restarting the computer and/or switching off the printer fixes the issue but this is really a pain to do that all the time!

This boring situation is caused by the  HPSLPSVC service, also known as the  HP Network Devices Support service. To fix that :

  1. Power off the printer.
  2. Open a Command Prompt with elevated privileges.
  3. Input the following command:  net stop HPSLPSVC.
  4. Power on the printer.
  5. Input the following command:  net start HPSLPSVC.

Now, check the HP Solution Center. Your printer should be available again!


How to properly install No-IP Dynamic Update Client (DUC) under Raspbian

If you have, like me, an ISP that provides you a dynamic IP, you certainly need to use a dynamic DNS service like DynDNS or No-IP. This is important if you want to use your Raspberry Pi as a server. I personally use No-IP for historic reason since I have my free account for at least 10 years. In that post I’ll teach you how to use their official client as a service under Raspbian.

The No-IP team provides a little program called the Dynamic DNS Update (DUC) Client. DUC continually checks for IP address changes in the background and automatically updates the DNS at No-IP dynamic DNS whenever it changes. This program can be usable under Raspbian without any modifications, only the part for setting up the service is a little touchy. Follow the guide!

Compile the DUC Client

The first thing to perform is getting and compiling the client. Open a Terminal (or use a SSH client, like PuTTY) then enter the following commands:

After that, the No-IP DUC Client will ask you some information:

  • The login/email string for your no-ip.com account;
  • The associated password;
  • The preferences (like the refresh interval).

The No-IP DUC Client is now ready to be used. Time to set up the service now.

Setting up the No-IP DUC Client service

Now that you have a working DUC Client, it’s time to install the service. Doing this will allow the DUC Client to start when booting up your Raspberry Pi.

After passing all these commands, you should have the following output:

Everything is now set up!

Checking if the No-IP service is working

First of all you need to check if the No-IP service is the latest to be run by the Raspberry Pi. Enter the following command:

The output should be something like that:

Running the No-IP service in the last position avoid some problems. For example, if your network configuration is not ready when running the DUC Client, this can crash it with useless error messages. I already configured everything in the additional files provided above to solve this problem.

For checking if the No-IP DUC Client Service is running, just enter the following command:

A correct output should be something like that:

As you can see, the noip2 service is up and running!

To get more information on the noip2 instance running, enter the following command:

This will output something like:

So everything seems fine. Now you can connect to your No-IP account and check if the concerned DNS has been updated, like this:

Manage Hostnames

Manage Hostnames

Wow you did it! Enjoy 🙂

Bonus

You can check for error messages thrown at startup by running the following command:

You can control the No-IP service by using the  service command:

This command will restart the No-IP service (this command takes up to 10 seconds to be run).

References

How to re-enable the F11 Recovery Key for HP computers

About 6 months ago, my sister told me this HP laptop has completely broken. When I got this computer, the HP G62-a57SF, I saw that the hard-drive died. And of course, no backup, nowhere. Plus, the recovery partition was gone 🙁

After buying a new SSD hard-drive for replacing the faulty and downloading all drivers from the HP website, I faced an interresting challenge: The F11 key launching the recovery process at boot doesn’t work anymore. Is it possible to get this F11 key back working? Short answer: yes! 🙂

First of all, this method was only tested on the HP G62-a57SF running Windows 7, I don’t know if it can work for other than that. Second, there is no way to get the original HP Recovery tool to work again because it’s really a pain to find it online. Nevermind, I’ve just used the great AnarethoS Recovery Tools package instead! This really nice package is designed to create custom recovery partitions like OEM manufacturers!

To get this F11 key working again, just download this package I made and follow the inside instructions. It’s a custom version of the AnarethoS Recovery Tools, so you don’t need to download its original version.

Have fun with your working F11 BIOS key for your HP laptop! 🙂

Setting a static IP on Raspberry Pi on Raspbian 20150505

For setting a static IP for the Raspberry Pi 2 on the latest Raspbian release available at this time (20150505 through NOOBS v1.4.1), the old method modifying the /etc/network/interfaces file isn’t so efficiency as before. In fact, if you modify the /etc/network/interfaces by setting eth0 to static instead of manual (the default setting) your Raspberry Pi will get two IP adresses for the same eth0 interface. This sucks.

The “faulty” is the dhcpcd daemon, which is a DHCP client that seems to be run before the parsing of the /etc/network/interfaces file.

So you have 3 options there:

  1. Setting like before in /etc/network/interfaces then disabling the dhcpcd daemon, with the sudo update-rc.d -f dhcpcd remove command (you can revert back with sudo update-rc.d dhcpcd defaults). But really, don’t do this;
  2. Add a static DHCP entry for your Raspberry Pi in your router/gateway configuration;
  3. Force the dhcpcd daemon to get the IP you like. It’s really the best solution for me.

To implement the latest solution, just sudo nano /etc/dhcpcd.conf then at the end of the file, add the following:

Of course, adjust the IP as you wish. the  192.168.0.1 IP address is referring to my ISP router.

After this modification, restart the network interface or just perform a reboot. Now, your Raspberry Pi will have only one static address!

Note: For those that dislike to set a hard-coded IP, the second solution is the best of course.

Sources: