 Français
If you have, like me, an ISP that provides you a dynamic IP, you certainly need to use a dynamic DNS service like DynDNS or No-IP. This is important if you want to use your Raspberry Pi as a server. I personally use No-IP for historic reason since I have my free account for at least 10 years. In that post I’ll teach you how to use their official client as a service under Raspbian.
The No-IP team provides a little program called the Dynamic DNS Update (DUC) Client. DUC continually checks for IP address changes in the background and automatically updates the DNS at No-IP dynamic DNS whenever it changes. This program can be usable under Raspbian without any modifications, only the part for setting up the service is a little touchy. Follow the guide!
Compile the DUC Client
The first thing to perform is getting and compiling the client. Open a Terminal (or use a SSH client, like PuTTY) then enter the following commands:
|
1 2 3 4 5 6 |
cd /usr/local/src sudo wget http://www.no-ip.com/client/linux/noip-duc-linux.tar.gz sudo tar xzf noip-duc-linux.tar.gz cd noip-2.1.9-1 sudo make sudo make install |
After that, the No-IP DUC Client will ask you some information:
- The login/email string for your no-ip.com account;
- The associated password;
- The preferences (like the refresh interval).
The No-IP DUC Client is now ready to be used. Time to set up the service now.
Setting up the No-IP DUC Client service
Now that you have a working DUC Client, it’s time to install the service. Doing this will allow the DUC Client to start when booting up your Raspberry Pi.
|
1 2 3 4 5 6 |
cd /usr/local/src sudo wget http://download.sizious.com/rpi/noip-duc-raspbian.tar.bz2 sudo tar -xjvf noip-duc-raspbian.tar.bz2 cd noip-2.1.9-1 sudo chmod +x raspbian.noip2.sh service.install.sh service.uninstall.sh sudo ./service.install.sh raspbian |
After passing all these commands, you should have the following output:
|
1 |
./service.install.sh: installing noip2 service for raspbian... OK! |
Everything is now set up!
Checking if the No-IP service is working
First of all you need to check if the No-IP service is the latest to be run by the Raspberry Pi. Enter the following command:
|
1 |
systemd-analyze blame |
The output should be something like that:
|
1 2 3 4 5 6 7 8 9 10 |
10.053s noip2.service 840ms networking.service 591ms systemd-logind.service 560ms keyboard-setup.service 460ms alsa-restore.service 447ms dhcpcd.service 437ms triggerhappy.service 434ms dphys-swapfile.service 373ms systemd-fsck-root.service ... |
Running the No-IP service in the last position avoid some problems. For example, if your network configuration is not ready when running the DUC Client, this can crash it with useless error messages. I already configured everything in the additional files provided above to solve this problem.
For checking if the No-IP DUC Client Service is running, just enter the following command:
|
1 |
systemctl status noip2 |
A correct output should be something like that:
|
1 2 3 4 5 |
● noip2.service - LSB: No-IP Dynamic Update Client (DUC) for Linux Loaded: loaded (/etc/init.d/noip2) Active: active (running) since Sat 2017-04-01 19:17:13 CEST; 4 weeks 0 days ago CGroup: /system.slice/noip2.service └─596 /usr/local/bin/noip2 |
As you can see, the noip2 service is up and running!
To get more information on the noip2 instance running, enter the following command:
|
1 |
sudo noip2 -S |
This will output something like:
|
1 2 3 4 5 6 7 8 9 |
1 noip2 process active. Process 705, started as noip2, (version 2.1.9) Using configuration from /usr/local/etc/no-ip2.conf Last IP Address set xxx.xxx.xxx.xxx Account xxxxxxxx@xxx.xxx configured for: host bonobo1985.no-ip.org Updating every 30 minutes via /dev/eth0 with NAT enabled. |
So everything seems fine. Now you can connect to your No-IP account and check if the concerned DNS has been updated, like this:
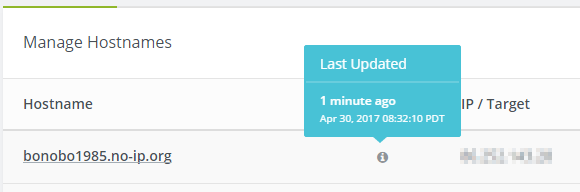
Manage Hostnames
Wow you did it! Enjoy 🙂
Bonus
You can check for error messages thrown at startup by running the following command:
|
1 |
dmesg | grep "noip2" |
You can control the No-IP service by using the service command:
|
1 |
sudo service noip2 restart |
This command will restart the No-IP service (this command takes up to 10 seconds to be run).
Thank you for this – it worked perfectly on my Pi Zero W. I probably could’ve figured it out, but you saved me a lot of time!
Hmm my Raspbian Jessie Lite headless does not have SRC under Local directory.
How can i run this without errors.
/USR/SRC
/USR/LOCAL
Sorry , Im new to linux
You rock. Thank you so very much for your help. I am bookmarking your site now!
Was looking for something like this. Thanks for the easy guide and help. I see you also included a service uninstall file. Will that uninstall just the startup service or the whole thing?
Hi and thanks for the comment! The uninstall script is just for my part, I mean it will uninstall the startup service only.
Hi,
First of all I want to thanks ..
It’s work
And now I want to ask one question ..
How do I change/edit user name ,password,and host in Duc noip that has been installed.
Because sometime we want to change the hostname
Thanks
Hi, thanks for the comment! All you need to do is:
sudo noip2 -C, tell me if it works or not for you. 🙂Hi,
We I try to use sudo noip2 -C command but our system shows the following error:
Configuration file ‘/usr/local/etc/no-ip2.conf’ is in use by process 964.
Ending!
As a result, I am unable to modify the conf file.
I tried sudo reboot, no luck
I tried sudo shutdown -h now, no luck
When I sudo nano the no-ip2.conf file there is a lot of unreadable characters like this:
0.0.0.0^@^@^@^@^@^@^@^@^@^E^@�5L2JA�^@^@^@^C^A^A^@wlan0^@^@^@^@^@^@^@^@^@^@^@dXNlcm5hbWU9Y2JyaWVy
However, the noip service is working and everything is running fine. Except, that we now need to change the noip account details to use a different noip account.
Any clues?
BTW: Great tutorial!
Thanks!
For those having the same issue, I just found a workaround:
ps -A |grep noip
1577 ? 00:00:00 noip2
sudo kill 1577
After I killed the process, I was able to use the -C command and set the new account.
Cheers!
More correct would be
sudo systemctl stop noip2
sudo noip2 -C
sudo systemctl start noip2
Worked perfectly on my Raspberry Pi Zero W – thank you.
Stupid question – what do I do next?
Activate apache php mysql?
How do I get my localhost visible at No-IP hostname URL?
It depends of what do you want to do with your Pi. 🙂 This tutorial give the ability to contact the Pi on the Internet nothing more. You can indeed install a HTTP/FTP server(s), or any other service. 🙂
Or you can just enable xRDP or SSH to manage the Pi remotely?
worked great. i was doing n my own but couldnt get it to autostart at boot. this worked. it seems i know enough of linux to start something. finishing not so much. thanks
It was very hard to find the “sleep” part, I was getting random errors because the DUC tool was started too early (before Internet connection ready). This was a real pain to understand and that’s why I wrote this post. 🙂
Excellent! Very easy guide.
Please keep posting great tips for Raspberry Pi users.
Again, Excellent!
Thank you! Expect more to come. 🙂
Hi
Thanks for yours efforts and then to publish them. This is just what I need to do.
I have already followed the DUC install instruction from NOIP and it installs under /home/pi/noip.
This works Ok but must be manually start after each reboot.
Your tut installs under /usr/local/src
Can I just follow the instruction for setting up the DUC client service or will there be issues with file location?
I think you installed the tool without the
sudocommand, right?If you start again from scratch with the content of this post, I think you’ll have the DUC service directly in
/usr/local/src, which is the right place to store this. 🙂Pingback: Security for your Alexa-DTV – Mindless Ramblings of a Geek!
Hi Again,
How can we change the “Updating every 30 minutes via /dev/wlan0 with NAT enabled.” to 5 minutes?
Thank you!
Hi,
I am trying to add a hostname to the file and it does not appear to add.
I have tried the
sudo noip2 – C, but no results.
It states the following:
Configuration file ‘/usr/local/etc/no-ip2.conf’ is in use by process 29126.
Ending!
I am definitely not a Linux user, so any help welcome.
Regards,
Andrew.
That message indicates that you currently have a noip process running. Try the following command to kill that process first:
sudo noip2 -K 29126
Then, try your original command again.
Well done! I a complete Linux/Raspbian noob but followed your advice. It works – NoIP DUC auto starts. Thank you for your work and explanation.
How do i unninstall no ip from raspberry ???
Hello there,
When I attempt to” sudo wget http://www.no-ip.com/client/linux/noip-duc-linux.tar.gz”
I get the following message:
–2018-05-08 13:21:32– http://www.no-ip.com/client/linux/noip-duc-linux.tar.gz
Resolving http://www.no-ip.com (www.no-ip.com)… failed: Temporary failure in name resolution.
wget: unable to resolve host address ‘www.no-ip.com’
What may be causing this and how can i fix it?
thank you
Hello!
I think you have some connectivity problems with your Pi. Try to click on the link you just posted, and you’ll see that the download will work. 🙂
BR,
SiZiOUS
Hi SiZiOUS,
I’m trying to grab your noip-duc-raspbian.tar.bz2 file but download.sizious.com is not resolving. I can ping sizious.com from my Pi just fine, but not download.sizious.com. Basically “sudo wget http://download.sizious.com/rpi/noip-duc-raspbian.tar.bz2” isn’t working. Can you see if something’s down on your end or update your instructions with a working download link? Thanks!
Hi Mike!
I’ve just tested now, and it seems that the link work, as you can try by double-clicking the link 🙂
I think my host has some problems sometimes with virtual subdomains, sorry for this.
May you try it again and tell me if you still have the problem? 🙂
BR,
SiZiOUS
i have a problem when using: sudo tar xzf noip-duc-linux.tar.gz
it say:
gzip: stdin: not in gzip format
tar: child returned status 1
tar: Error is not recoverable: exiting now
how can i fix this, thank 😀
I think your download failed, retry to download noip-duc-linux.tar.gz again. 🙂
ya, it fixed, don’t know why yesterday i try again and again but it have that problem, all good now, thank for your answer 😀
This was very well laid out and easy to follow, especially for someone brand new to Linux as myself. The bonus commands and explanations are also appreciated.
i successfully installed but the ip seems incorrect It update an ip 73.161.215.XXX
but actually the right ip is 192.168.1.XXX
why was that
The IP 192.168.1.xxx is your local (or private) IP, where your IP 73.161.215.XXX is your public IP.
No-IP is intended to translate your public IP into a nice DNS. So your configuration seems to be working! 🙂
Hi SiZiOUS, thanks a lot for this very clear procedure.
Unfortunately, the IP update check is only done once after startup (or once after killing & restarting the process). When I type ‘systemctl status noip2’ the status mentions ‘active (exited)’ and not ‘active (running)’.
Any idea what could be the cause or what I can try? I’m using the latest Raspbian Stretch Lite image.
Many thanks for your feedback,
Gugu
Hi Gugu,
First of all thanks for your comment!
May you try the following command:
sudo journalctl -xe | grep "noip"In order to see if there is a issue with the daemon?
Hi Gugu, were you able to find why is it just updating once on startup or in my case, if I explicitly use noip2 -i then it updates, but failing to update ip in a timely way when running as service in background. Just happens once when it starts up. I did notice a warning about 700 file permission on the noip2.conf file – but altering that too hasn’t helped. Guess I’ll need to go into noip2.c file and debug 🙂
I have tried several tutorials for getting this up and running, and finally, after going through this one, it finally works on boot! Other tutorials would give an error message about not reaching their site, and would only be resolved after manually restarting the service using
systemctl restart noip2. Thank you for this!Good Morning Sizious. I have the client running – thank you for the tutorial – with an update time of 5 minutes.
My question is: what happens every 5 minutes?
1 does the client send its current IP address to the noip server?
or
2 does it check the current IP address and only contact the noip server if the IP address has changed?
I think the good answer is 2: if the DUC daemon detects that your IP changed, it send it back to the noip server. By the way you may check directly on the noip server if the IP changed as shown in the screenshot present in the tutorial!
Thanks Sizious.
I assumed that (2) was the more likely answer.
I have a router running at a (physically) remote site. It has an internal noip client. However noip does not always get updated if the IP address changes.
So I am running a raspberry pi with the noip client in parallel to see if I can figure out what is going wrong.
Now I just have to be patient and wait until the ISP changes the IP address.
I did find that if I reboot the Pi, this results in an update timestamp on the noip server.
Thanks again
Boyd.
I also would like to thank for this nice tutorial.
Hopefully (2) is the the answer and the local service will sent an update, when the ip changes. In my case, the ip stays the same for months and i can’t initate a change myself like rebooting the ISP Router.
So now i have to wait months until the next change to see if the solution works for me 🙂
I found that my dynamically allocated WAN address almost never changes – it has not done so for several months (and really there is no reason why it should).
So I added the following sling to the system crontab to automatically restart the noip2 service every Wednesday (day #3) at 4:05am to refresh my entry in the no-ip database – seems to work OK
05 04 * * 3 sudo systemctl restart noip2
@Paul Higgs
Thank you, that works for me. I added an @hourly job, so my ip gets now renewed every hour.
Sizious,
Thanks for your guide. I used it in an amdx64 Debian stretch install… since raspbian is based on Debian it worked 100%! Why don’t you use certbot and make your web server ssl encrypted so I can type in my real email address when commenting knowing you are the only eyes that will see it?
Regards
Yeah you’re right, I need to plan to migrate my website to https, I will do it for sure, don’t know when but it’s in my mind since 6 months at least! Thx for the comment btw!
Very helpful guide. It worked without modification under Raspbian Stretch, but when I set it up under Raspbian Buster (RPi3B+), I was getting Last IP Address set 0.0.0.0 (until I manually restarted noip2; after manual restart it worked properly).
I then changed “sleep 10” to “sleep 60” in /etc/init.d/noip2, and that fixed the problem.
Thank you !
The guide on the No-IP site took me as far as installing, but not running as a service.
How silly is that ?
Your guide was so useful.
And now it seems to be working !
Hi, thanks for the info. If I run systemctl status noip2 I get 12 hosts from noip but if I run sudo noip2 -S I get 16 hosts returned from noip… its as if the process isn’t update? Is there a command to update the noip2 process.
Thanks.
Hi there!
Thanks a lot for sharing your code.
I ran the install command and I got the following message. Maybe you can help me understand what’s happening with the transient or generated thingy?
pi@raspberrypi:~/noip-service-sizious/noip-2.1.9-1 $ sudo ./service.install.sh raspbian
./service.install.sh: installing noip2 service for raspbian… Failed to enable unit: Unit /run/systemd/generator.late/noip2.service is transient or generated.
OK!
Thanks!
Hi
Thanks for a great howto, I have used it on several raspberry pi.
Just putting together a new build with raspbian buster and I got this, not sure if there is an issue yet?????
pi@weatherpi:/usr/local/src $ sudo tar -xjvf noip-duc-raspbian.tar.bz2
noip-2.1.9-1/raspbian.noip2.sh
noip-2.1.9-1/service.install.sh
noip-2.1.9-1/service.uninstall.sh
pi@weatherpi:/usr/local/src $ cd noip-2.1.9-1
pi@weatherpi:/usr/local/src/noip-2.1.9-1 $ sudo chmod +x raspbian.noip2.sh service.install.sh service.uninstall.sh
pi@weatherpi:/usr/local/src/noip-2.1.9-1 $ sudo ./service.install.sh raspbian
./service.install.sh: installing noip2 service for raspbian… Failed to enable unit: Unit /run/systemd/generator.late/noip2.service is transient or generated.
OK!
pi@weatherpi:/usr/local/src/noip-2.1.9-1 $ sudo ./service.install.sh raspbian
./service.install.sh: installing noip2 service for raspbian… Failed to enable unit: Unit /run/systemd/generator.late/noip2.service is transient or generated.
OK!
pi@weatherpi:/usr/local/src/noip-2.1.9-1 $ systemd-analyze blame
10.030s noip2.service
5.297s hciuart.service
2.696s raspi-config.service
2.447s udisks2.service
1.882s dev-mmcblk0p2.device
I got the same “failure” and “OK!”.
After rebooting ps aux | grep noip lists /usr/local/bin/noip2 running
Seems that the provided script here doesn’t work anymore, I need to update it; so you may check my GitHub in a few days 🙂
do you have a link to the new script..not been able to find your GitHub page
i got eh same Failed error
thanks
‘sudo make’ does not work on Buster in my case 🙁
pi@storjpi4:~/noip/noip-2.1.9-1 $ sudo make
gcc -Wall -g -Dlinux -DPREFIX=\”/usr/local\” noip2.c -o noip2
noip2.c: In function ‘dynamic_update’:
noip2.c:1595:6: warning: variable ‘i’ set but not used [-Wunused-but-set-variable]
int i, x, is_group, retval, response;
^
noip2.c: In function ‘domains’:
noip2.c:1826:13: warning: variable ‘x’ set but not used [-Wunused-but-set-variable]
int x;
^
noip2.c: In function ‘hosts’:
noip2.c:1838:20: warning: variable ‘y’ set but not used [-Wunused-but-set-variable]
int x, y, z;
^
noip2.c: In function ‘autoconf’:
noip2.c:2538:19: warning: ‘%s’ directive writing up to 255 bytes into a region of size 247 [-Wformat-overflow=]
sprintf(line, “%s%s%s%s”, USTRNG, login, PWDSTRNG, password);
^~ ~~~~~
noip2.c:2538:2: note: ‘sprintf’ output between 16 and 526 bytes into a destination of size 256
sprintf(line, “%s%s%s%s”, USTRNG, login, PWDSTRNG, password);
^~~~~~~~~~~~~~~~~~~~~~~~~~~~~~~~~~~~~~~~~~~~~~~~~~~~~~~~~~~~
I opened a case with noip.com 🙂
Hi there, I too am getting the above error running buster:
noip2.c:2538:2: note: ‘sprintf’ output between 16 and 526 bytes into a destination of size 256
As of 12 December, 2020 – was there any resolvement to the issue that has errornourly not been reported to the community? Many thanks!
In response to my own message, I’m going to ignore the warnings and see how far that gets; its the error on line 1538 that is worrying